Ikonopedia Mammography Technologist Workflow Including the Patient Questionnaire
· Initial Sign In – (depends on integration – either as desktop shortcut or a single sign on)
o Desktop Shortcut - Input email and click “Forgot your Password” and a link to create your password will be sent to your email
o If given an “Alias” (shorter version of your email) you could also use that to sign in
o Check Spam/Junk mail if you do not see the email with the link
o Ikonopedia does not require that you change your password (can remain the same)
Ikonopedia Worklist
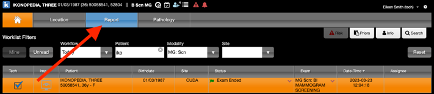
· Can use the various worklist filters to help narrow the patient exams list
o Workflow “Today” (example below)
o Can search “Patient” by name, initials, MRN, or Accession
o Can add modality option(s) to narrow list
o Can add “Site” that you are currently working at (if applicable) to narrow list
Patient Exam
· Click on the exam to highlight orange
o Important to check the “Tech” box (first column for exam credit and MQSA audits)
o Up to three technologists can receive credit for an exam by signing in individually and checking the “Tech” box (mostly needed by mammo techs)
o Start the exam in RIS or in Ikonopedia (this workflow is site/integration dependent)
Patient Questionnaire with Tyrer-Cuzick Risk Assessment
· Initiate or review the questionnaire
o This step is dependent on who will be administering the questionnaire (front office and/or technologist workflow)
o With the patient highlighted, click the “Q” seen at the top of the worklist screen
o It is Important to always check to see that it has been completely filled out and/or to review the answers and alerts

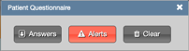
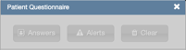
· Answers and Alerts
o If these options are grayed out or not active, then the “Q” has not been filled out
o Click the “Answers” button to review (do not add notes here- radiologist will not be able to view and please see “Patient Viewer” below)
o Can check the “Hide No Answers” to show only the yes or pertinent information
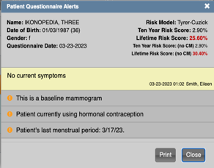
o Click the “Alerts” button to review (radiologist will automatically see alerts when they open the exam)
o Clear button will ask you to input a “PIN” to clear or erase the questionnaire
Questionnaire filled out Questionnaire not filled out
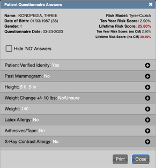
· Risk Assessment
o The “Tyrer-Cuzick” risk assessment will automatically highlight unless the patient has marked that she has had breast cancer, or it is a male patient which will highlight the “Family History No Risk Assessment” option
· Language
o If opening a tablet, for the patient to fill out, pick the appropriate language and open “Patient Format” (HIPAA Compliant format)
o Standard languages are English and Spanish with additional languages available
o You will always see the answers in English
o Language option is important for the patient to receive their result and reminder letters in their native language (automatically selected from Patient Format)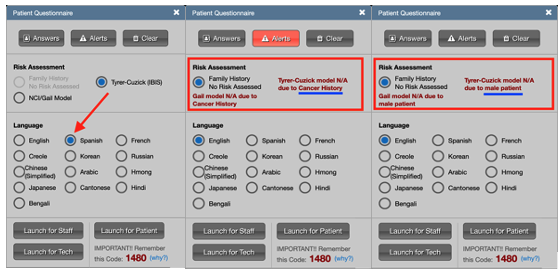
Questionnaire Formats
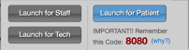
· Launch for Patient -Patient fills out the Questionnaire (HIPAA Compliant – Requires User Specific Code seen in red)
· Launch for Tech- Technologist can review or answer questions for the patient (scrollable view and not HIPAA Compliant)
· Launch for Staff - If front office fills out the Questionnaire for the patient (a question per page – not HIPAA Compliant)
o Important –If handing a tablet to the patient it MUST be in the “Launch for Patient” format to remain HIPAA Compliant with the user specific code seen in red
o This user specific code remains the same with every sign-in, every patient, and others on the team may have the same number
o It may be helpful to keep a list of user codes in case a different user, from the one who opened it, needs to exit the questionnaire
o If someone assists with filling out the questionnaire in English, once completed and saved, click the “Q” again to pick the language, open the questionnaire, update/highlight the same answer on the first question, and exit so that it selects the letters in their native language
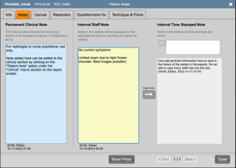
Patient Viewer -
(ability to add communication for the radiologists to review)
Note: Patient Viewer can be accessed from the worklist and/or the report screen


o Internal Staff Note (yellow)
o A quick communication to the radiologist about the patient’s exam (like a yellow post-it-note)
o Timestamped and can be edited and/or deleted at the next visit
o If the note is not updated the radiologist will see an alert bolded in red e.g.,
Alert: This note is 6 months old
o Timestamp can be updated by adding the cursor to the text field and clicking the space bar, or by adding another note
o Internal Time Stamped Note (gray)
o Notes added or copied into here are saved permanently within Ikonopedia
o Do not copy every staff note only those that are pertinent to the patient’s history
o Permanent Clinical Note (blue)
o For the radiologist or nurse practitioners use only
o Any notes added here will be added to the clinical section of the report
o Can be updated or removed
o Patient “Canvas” (optional and site dependent)
o Ability to add symptoms, scars, moles, medical device, tattoo’s
o Does not replace mammography image markers
o Click on an option to highlight and click into the breast diagram(s)
o Will be timestamped
o Can left click hold to enlarge and/or rotate in the diagram
o Click the eraser icon and highlight an option to remove it from the diagram
o Will show in the “Alerts” for the radiologist to view
o Can document imaging views, technique, and/or prior dates
o Contains a quick-toggle grid to pick Bilateral, Right, or Left options
o The grid can expand to show all options or collapse for the most common views
o Keep in mind not to duplicate techniques here and from the report screen
o If set up for auto-insert of screening technique you will see that option already checked

Note: Be sure any changes to the patient’s questionnaire and/or notes are completed prior to marking the exam as completed/ready to ready or before the radiologist opens the exam
Report Review (if manually adding technique, priors, additional reason for visit information)
· With patient’s exam highlighted, click the “Report” option on the navigation bar
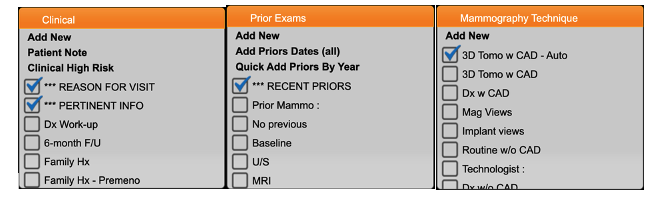
Report Macro Sections Below (auto-inserted priors or technique macros are customer dependent)
· Macros with the blue check and the word “Auto” are automatically added
· Macros with the blue check and three asterisks (***) are automatically added
· Any macro you manually add can easily be removed and/or edited by the radiologist
· Technique sections update per modality (Mammography Technique example below)
Clinical Section - (workflows are dependent on integrations or protocols per customer/site)
· “Reason for visit” e.g., 47-year-old female presents for screening mammogram, will automatically be inserted into the report for the radiologist
· “Pertinent Info” or alerts from the patient questionnaire and risk will automatically be inserted into the report for the radiologist
· Customer/site dependent, radiologists may ask the technologists to add more information that’s not automatically carried over e.g., reason for visit: 6-month follow-up etc.
Prior Exams Section - (workflows are dependent on integrations or protocols per customer/site)
· Customer/Integration dependent if the system auto-inserts the prior exams
· Customer/site dependent if the technologists or radiologists add the prior exams
· The number of years added depends on each customer/site
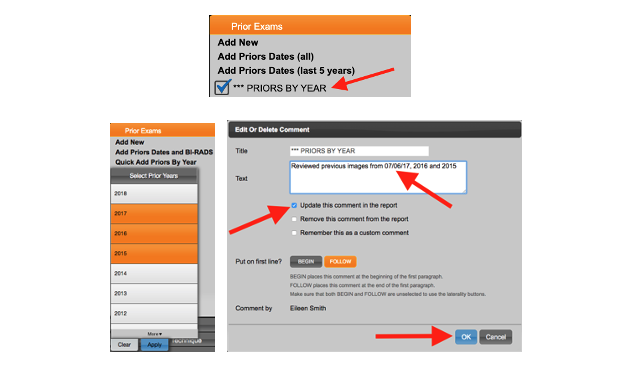
· As needed, can click the bold words “Quick Add Priors by Year” to manually add years
· When there are signed reports within Ikonopedia (including imported exams) you can click the bold “Add Prior Dates” options (All or Last 5 years)
· Radiologists can edit, add, or delete macros that were added
Note: All macros can be edited (example shown below) and please reference a separate workflow guide for “Custom Macros” that goes into more detail 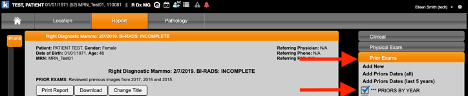
To Customize a macro, click on the words/title outside the blue checked box which will open the Edit or Delete Dialog Box to edit e.g., month and day to the year in the example below
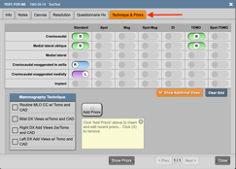
Mammo, US, and MRI Technique Sections (dependent on integrations and/or protocols per site)
· Customer/Integration dependent the techniques can be automatically inserted
· Click on the appropriate technique macros given the exam (as many as needed)
· Easy to remove a macro by unchecking the blue checked box
· Mammo views/Technique can also be added in the Patient Viewer (see separate guide)
Mammography Technique Section
Ultrasound Technique Section
- Exit the report screen by clicking the “Home” icon on the navigation bar

Update the exam status (Site dependent in RIS or Ikonopedia) to completed/ready to read
 Note: It is very important that any changes or edits to the patient’s questionnaire, patient viewer, and/or the report macros are completed prior to marking the exam as completed. If already opened by the radiologist, they will not see the updated information, risk, and/or alerts.